Skip to content
Free Shipping on Orders over $1000 — Free Shipped Samples — Most Orders Ship within One Business Day — Terms apply

Cleaning Bare Wood Surfaces

HOW TO CLEAN BARE WOOD SURFACES USING WOOD RENEW AND LOG WASH

When properly used and applied, their use will result in the best possible appearance and performance of a Lifeline™ finish.

PERMA-CHINK SYSTEMS WOOD CLEANING PRODUCTS

Log Wash™ – A general purpose, low-pH cleaner concentrate for removing dirt, grime, pollen, stains from surface mold and mildew from bare wood surfaces and existing finishes. Log Wash will also remove some types of brown stains and lighten the color of bare wood. Log Wash is not effective for removing grayed, oxidized wood fibers. Whenever bare wood surfaces are left exposed to the elements for more than seven days, the surfaces should be cleaned with a solution of Log Wash before the first coat of finish is applied. Wood ReNew™ – A concentrated powder that is dissolved in water and applied to bare wood. When used with a pressure washer, it will remove gray, oxidized surface wood as well as dirt, pollen, mold and mildew. Although Wood ReNew usually lightens the color, it can occasionally darken the wood depending on the wood species and the types of chemicals previously applied. Wood ReNew is the product of choice for removing mill glaze from new wood surfaces.

CLEANING EXTERIOR BARE WOOD SURFACES

NEW LOG HOMES

Step 1: If the wood has not grayed, wash the surface with a two cups per gallon Log Wash solution and a pressure washer no more than seven days prior to staining. Apply and clean from the bottom up and rinse from the top down. Rinse well and allow the wood to dry.

Step 2: If there are signs of gray weathered wood, use Wood ReNew according to the application instructions along with a pressure washer.

Step 3: If after Steps 1 or 2 there are still dark streaks or discolorations on the surface, use a solution of Oxcon™ oxalic acid on the entire wall according to the directions for use. Be sure to dilute the Oxcon concentrate with four parts water. Apply the solution from the bottom up, begin washing it off starting at the bottom then rinse thoroughly from the top down. Be sure to completely rinse the Oxcon solution off the wall and allow the wood to dry before staining. Never use Oxcon unless it is absolutely necessary.

NEW LOG SIDING

New log siding must always be cleaned, since it presents an especially difficult challenge to a finish system. Typically used in high exposure locations such as dormers and gable ends, siding is often manufactured from lower quality wood than logs, and frequently green wood. This makes siding more susceptible to twisting, warping, and cracking. Since siding does not have the high thermal mass of full logs, during the summer months its temperature can range from 70ºF to 160ºF or higher during the course of one day. This puts a lot of mechanical stress on the siding and its finish, resulting in small fissures forming on the surface. Rainwater can then enter these fissures and get into the wood, behind the finish. Log siding is typically milled quite smooth and often has a mill glaze on the surface, which if not removed, prevents the proper adhesion of the finish.

Step 1: To remove mill glaze and prepare siding for the first coat of finish, clean and pressure wash the surface of the siding using Wood ReNew no more than seven days prior to staining. Apply the solution of Wood ReNew and pressure wash from the bottom up, and rinse from the top down. Allow the siding to dry before staining.

HOMES THAT HAVE BEEN SANDED OR MEDIA BLASTED

Step 1: If the surface of the wood has been sanded or media blasted, it is not considered clean. Wash the surface with a two cups per gallon Log Wash solution and a garden hose (pressure washing is not required) no more than four days prior to staining. Apply and clean from the bottom up, and rinse from the top down. Allow the wood to dry before applying the first coat of Lifeline pigmented stain or Prelude™ Clear Wood Primer.

HOMES THAT HAVE HAD A FINISH REMOVED USING A CHEMICAL FINISH REMOVER

Step 1: If a finish has been removed using a chemical stripper, there may still be some types of discolorations present on the wood. Cleaning with a two cups per gallon Log Wash solution and garden hose, or pressure washer, will remove many types of tannin (brown) stains and even out the color of the bare wood surfaces. If the surface feathered during the finish removal process, and the feathers were removed by sanding, or with an Osborn brush, it will be necessary to clean the surface again with Log Wash. Use a two cups per gallon solution and apply and clean from the bottom up, then rinse with a garden hose from the top down. Allow the wood to dry before applying the first coat of pigmented stain.

Step 2: If, after the finish has been removed, there are areas of grayed wood fibers, apply Wood ReNew according to the directions and clean the surface with a pressure washer. Rinse well and allow the wood to dry before applying the first coat of pigmented stain.

APPLICATION OF LOG WASH

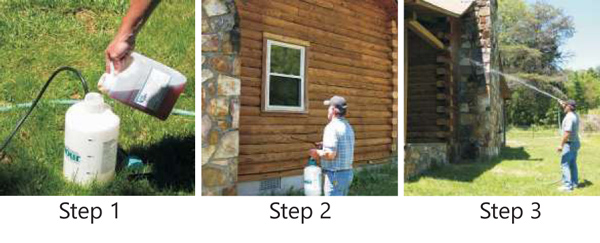
Step 1: Add 1 gallon of water to your sprayer then add approximately 2 cups of Log Wash. If you add the Log Wash first, the sprayer will fill with foam. Be sure solution is mixed well.

Step 2: Spray the surface with the mixed Log Wash solution. Start at the bottom and work up. Allow 10 to 15 minutes contact time. Do not allow the surface to dry.

Step 3: If necessary, scrub the wall starting at the bottom and work up then rinse from the top down until you see no more foam running down the wall.

cleanwoodsurfaces

APPLICATION OF WOOD RENEW

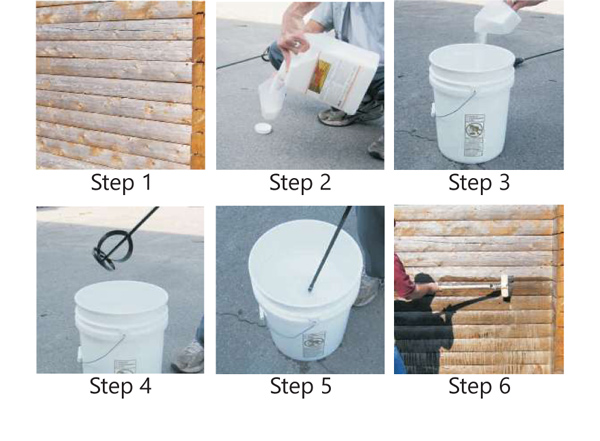
Step 1: Use Wood ReNew to remove grayed surface wood.

Step 2: Only measure out enough Wood ReNew to add to a few gallons of water (0.8 cups per gallon) at a time. You need to use whatever you mix up within 1 to 2 hours.

Step 3: Pour the Wood ReNew into a pail that contains the water. Do not mix Wood ReNew in a sprayer.

Step 4: Mix the Wood ReNew with the water using a paint mixer and an electric drill.

Step 5: Stir for about five minutes or until no undissolved granules are visible. Allow the solution to thicken for 10 minutes before using.

Step 6: Apply the Wood ReNew solution to the wall with a mop, broom, or car wash brush. Start at the bottom of the wall and work up. Allow the solution to remain on the wall for 10 minutes.

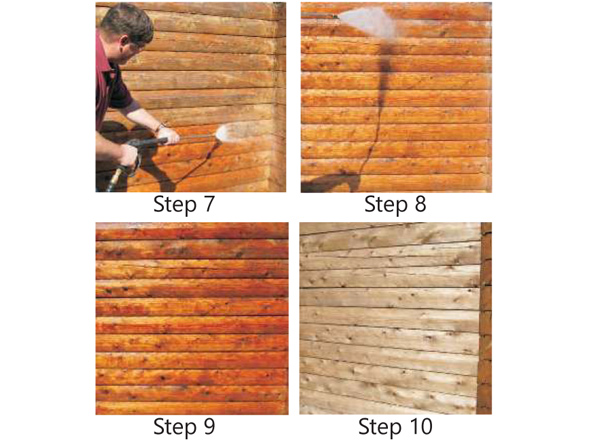
Step 7: Pressure wash starting at the bottom of the wall. Work on 2 or 3 courses of logs at a time. Hold the wand at a 30 to 45 degree angle to avoid feathering the wood.

Step 8: Once the entire wall is pressure washed, rinse the wall starting at the top and work down. At this stage water volume is more important than pressure.

Step 9: Never judge the effectiveness of Wood ReNew or any other cleaner while the wood is still wet.

Step 10: Once the wood dries, many of the dark discolorations will disappear. This is the same wall that appears in the previous step after drying for three hours.cleanwoodsurfaces2

cleanwoodsurfaces3

A NOTE ABOUT RINSING

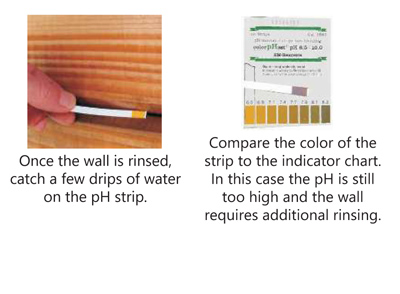
No matter what product you use to clean bare wood, nothing is more important than making sure you have adequately rinsed the surface. Any chemical residue remaining on the wood can have serious consequences later on. We always recommend using pH strips to make sure that the surface of the wood has been sufficiently rinsed, preferably to a pH of between 6.5 and 7.5. pH strips are available at most pool supply dealers, aquarium supply shops, and Perma-Chink Systems, Inc. They are not expensive and are very easy to use.

CLEANING INTERIOR BARE WOOD SURFACES

Interior walls and ceilings must be cleaned prior to finishing. If your home is completed, you are somewhat limited in the available cleaning methods since the use of a pressure washer is typically not an option. If you want your interior walls smooth, sanding may be your best and only choice. As opposed to exterior surfaces, you can sand interior wood surfaces using 120 grit sandpaper or Osborn brush.

Although your interior wood surfaces may appear to be clean, they are never clean enough to apply a finish to them without first washing them with an appropriate cleaning solution like Log Wash.

Step 1: Mix one half or one cup of Log Wash Concentrate with one gallon of warm water, if available, in a pail.

Step 2: Apply the Log Wash solution to the wall with a rag or sponge starting at the bottom and work up. Allow the solution to remain on the wall for at least 10 minutes.

Step 3: Using a clean rag or sponge and a pail of clean water, wipe the Log Wash solution off of the surface. Frequently rinse the sponge or rag in the pail of water and occasionally exchange the water in the pail with clean water.

Step 4: Allow the surface to completely dry before applying the first coat of finish.

cleanwoodsurfaces4

Previous article Media Blasting Versus Chemical Stripping
Next article Spot Cleaning and Stripping

Leave a comment

Comments must be approved before appearing

* Required fields