

It is virtually impossible to prevent logs from developing cracks and checks as they age and dry. That’s because as a large piece of wood seasons, mechanical stresses build up until the surface stress becomes so great that the wood cracks. We call these stress cracks “checks.”
Do checks need to be sealed? Upward facing checks can collect water, increasing the interior moisture content of the log. If they continue to collect water and the wood remains damp, they can eventually result in internal wood decay as well as provide nesting sites for carpenter ants and other insects. It is not necessary to seal checks on the bottom half of round logs since they do not collect water, but for a uniform appearance you may want to seal them, too. It is not usually necessary to seal checks or fissures that are less than 1/4” wide, since they cannot accumulate that much water.
If your home is new and the logs or siding are green, it may be best to wait a year or so before addressing the checks. This allows the wood to reach an equilibrium with its environment and by then most of the larger checks will have opened. On seasoned wood or an older home that’s in the process of being refinished you can seal the checks either before or after applying a stain.

CHECK MATE 2
Checks and splits in logs present a different set of dynamics than those typically addressed by a caulk. They open and close as the log’s moisture content varies throughout the year. The opening width of a check may change as much as 50% from summer to winter. Most sealants are designed to cope with a different set of conditions and are ill suited for sealing checks. Check Mate 2™ is specifically formulated to meet the particular requirements for sealing checks that appear in logs and log siding.
When initially applied 3/8” thick in a check the Check Mate 2 bonds to the sides of the check. As the check opens, the Check Mate 2 stretches to maintain a water-tight seal. The role the Backer Rod plays is to maintain a Check Mate 2 thickness of 3/8” during the application and two point contact with the wood. Two point adhesion enables Check Mate 2 to elongate and contract.
APPLICATION DIRECTIONS
Step 1: Begin by cleaning any dust, dirt, oil, solvent or previous sealer out of the check. Previously applied caulks can usually be easily pulled or scraped out with a hook knife. If the check is upward-facing and has allowed water penetration, pour some Shell-Guard RTU into it. This will kill any decay fungi present and prevent further deterioration of the log due to rot. If the wood within the check is damp from cleaning, rain, or a borate treatment, make sure the check has time to dry before applying Check Mate 2. You can speed up the drying process by blowing the water out of the check with a leaf blower. The last thing you want to do is to trap any water within the check.
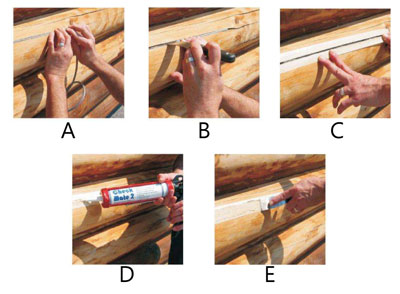
Step 2: For sealing checks 1/4” wide or larger, Check Mate 2 should be always used in conjunction with Backer Rod. Insert the Backer Rod into the check and use a trowel or other implement to push the Backer Rod about 3/8” to 1/2” deep (Pictures A & B). If you push it deeper than 1/2”, the cured Check Mate 2 will be too thick and may rip away from the sides of the check. If the Backer Rod is placed too close to the surface the Check Mate 2 may end up too thin and split.
Step 3: For a neat, clean appearance you can use masking tape to mask off the wood on either side of the check (Picture C). Be sure to remove the masking tape right after you tool the Check Mate 2 smooth. If you remove the masking tape after the Check Mate 2 has begun to dry, you will pull the top layer of Check Mate 2 off along with the masking tape.
Step 4: Cut the tip of the Check Mate 2 tube to about the same diameter as the checks you plan to fill (a little smaller diameter is better than one too large). Fill the space between the Backer Rod and log surface with Check Mate 2 using a standard caulk gun. Check Mate 2 must have good contact with wood on either side of the check and be sure the crack or check is completely sealed from end to end (Picture D).
Step 5: Tool the surface smooth with a trowel, spatula or wet finger and remove overflow immediately with a damp cloth (Picture E). Don’t forget that the masking tape must be removed while the Check Mate 2 is still wet.
Step 6: Check Mate 2 will dry to the touch in about one hour, but complete curing may take several days, depending on application thickness, temperature, and weather conditions. The color of Check Mate 2 as it comes out of the tube is always lighter than the final cured color.
Note: Newly applied Check Mate 2 Clear is white but turns clear when cured.
Step 7: Clean tools and hands with soap and water.
Leave a comment